
Lately, I’ve had a problem. When I started out playing live electronic music, I quickly realized the value of rack-mounted gear, in terms of making setting up for a show quicker and easier. In the last few years, however, I’ve moved away from rack-mounted gear in favor of using laptop-based software combined with hardware controllers – things I can put my hands on during a show. However, I still wanted the quick and easy setup that I got when I carried a rack of gear. The ideal is that I’d get to a gig, pop off a cover, plug a few things in, and be ready to go.
The reality the last few years, however, has been that I’d take out four or five pieces, plug in all their respective cables (power, audio, MIDI, USB, etc) and carefully assemble this network of stuff. At the end of the night, I’d tear it all down again. Since all the pieces were things I needed to have my hands on, they don’t lend themselves well to being mounted in a rack, so after doing some thinking and experimenting, I came up with the idea of creating a controller board, in the spirit of the pedalboard a guitarist might use (as a side note, I’ve only recently stopped carrying a pedalboard in favor of my Line 6 PodXT Live, which does it all in one tidy box).
The design I came up with consolidates my reworked USB QWERTY keyboard, my repainted PC1600x MIDI fader box, a USB hub, and a 4-channel MIDI interface, and requires only plugging in a few cables after taking it out of the case. The photos below document the process.
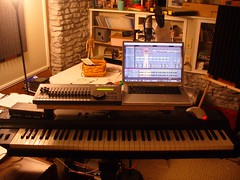
Initially, my thought was that I’d simply create a folding shelf that would fit into my laptop bag, and save the trouble of carrying a big, long shelf to set on an X-stand or my Deltex stand. You can see what my rig looked like with that shelf in place below:
However, I quickly realized that the folding shelf by itself didn’t save me any time in setting up, so I kept thinking about it. I realized what I needed was permanently mounted and connected gear, much like a pedalboard. After doing some design sketches, I came up with the following design. I’d still make a folding shelf, but have one side dedicated to the two controllers I use most for my laptop (the PC1600x fader box and the USB QWERTY keyboard), and the other side as a place to put my laptop. The side of the shelf that holds the laptop would neatly fold under the side with the controllers for use in the studio, and storing in one of the aluminum cases I have for travelling with gear (side note: check Home Depot and Lowes for these – $20 or so, and some already come with foam!).
Here are some of the pictures from construction.
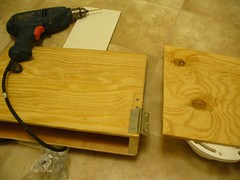
I constructed the two sides of the shelf from 3/8″ plywood, screwed together. Here you can see both sides once they were cut:

Putting the two sides together with the hinges:
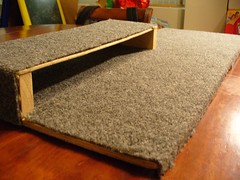
I decided to cover the shelf in carpet to prevent the nicks and dings that always happen when traveling with gear. It gives that pro rack look, too:
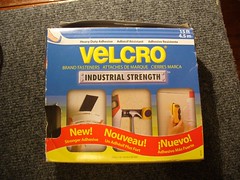
Here you can see me getting the pc1600x ready to stick down with velcro. I use this wide industrial-strength velcro, which works great:
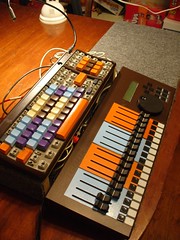
After the pc1600x went on, I added the USB QWERTY keyboard:
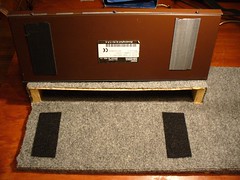
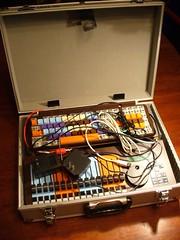
Here you can see the rear of the board, which has the connections for the MIDI interface (a 4 in, 4 out Edirol MPU64) and the USB hub (a 4-port Griffin USB Audio hub):

Here’s the final product. It will easily sit on a keyboard stand, although it’s shown here just on the case it travels in:

The board, folded up and in its travel case:
I’m really pleased with the final result. I now have a controller rig that I take out of its case, plug in a single power cable and a single USB cable, and have up and running in about 2 minutes (instead of the 10-15 minutes it would take me before, when I was assembling the whole rig each time).
You can see more photos, and larger details, at the chromedecay flickr site.
Update: This got picked up by Create Digital Music, a great music technology blog that I read. You can read the story and see comments at the site: Create Digital Music.