This week’s post is a look inside my music rig for my church. I spent some time this week getting things set up the way I want in order to expand my musical capabilities, so I thought I’d document and share it here for this week’s project.
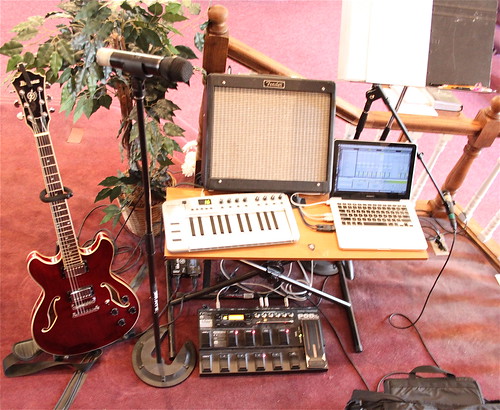
Here’s the overall rig, once it’s assembled:
My main role is as a guitarist, the main focus of this rig is playing guitar. You can see my guitar on the left – it’s an Ibanez Artcore A73 semi-hollowbody. It plugs into a Line6 PodXT Live, which in turn runs to a Fender Blues Junior amp. Both the PodXT and the Fender belong to the church, and stay there & are plugged in at all times, so setup is easy – plug in my guitar, turn things on, and I’m ready to play. A mic stand & wireless Shure mic are also set up full-time, since I sing as much as I can (sometimes I’m too busy strictly playing guitar!).
In addition to playing guitar, however, I’m also starting to slowly bring some electronic elements into the mix. As a solo musician, I typically play strictly instrumental electronic music, and finding an appropriate and musically valid way to integrate that part of my music into what I do at church has been a long, slow process. I feel like I’m finally making some progress, however!
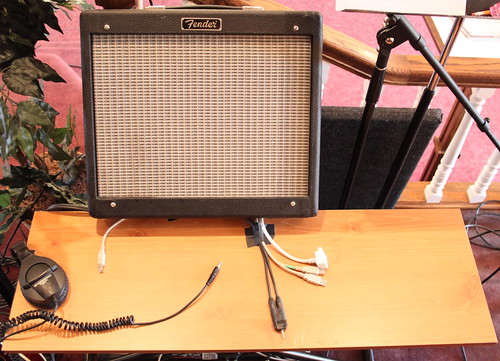
On with the rig! As you can see, there’s a shelf under the amp that’s gaff-taped to a keyboard stand, to form a wide, shallow table.
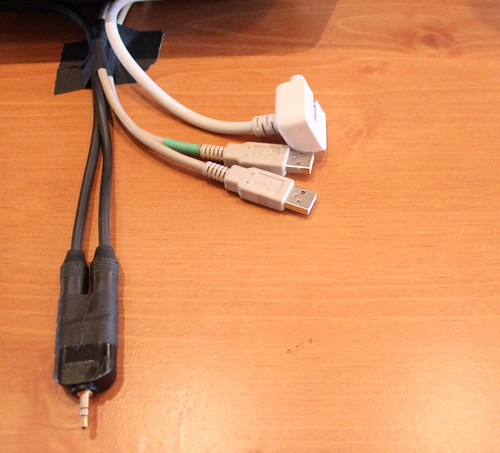
Here’s a closeup. 2 USB cables and an Apple power cord also stay gaff-taped to the shelf, along with a custom audio cable I made up. It’s a 1/8″ stereo miniplug on one end, and stereo 1/4 plugs on the other end. The 1/8″ stereo end plugs into my MacBook Pro’s audio output, and the other plugs into 2 separate DI boxes that run into our sound system. One of the USB cables runs to the left-side of the shelf, and is used to connect an M-Audio KeyRig keyboard (a small, lightweight 25-key USB keyboard controller). The other USB cable runs into the PodXT Live, so it can be used as an audio input into Ableton Live.
Having all this set up permanently means that setup is extremely fast. I pop the KeyRig out of my bag, plug it into its USB cable, set my laptop on the shelf, plug in 2 USB cables & the audio cable, then connect my power supply to the cord. Done!
The bottom of the rig is a little messy. On the top left, you can see two separate DI boxes, which run my laptop’s signal to two separate channels on the mixing board. You can also see the way the PodXT Live fits into the space of the keyboard stand. This is important because it helps my rig take up a smaller amount of space, and keeps everything together nicely. We don’t have a lot of room on the platform (lots of musicians plus choir) so every inch counts!
Now that I have my 1/8″ to stereo 1/4″ cables, I’m able to split the stereo audio output from my laptop into 2 discrete channels. The left channel strictly carries a click track (metronome), while the right channel carries everything else, which might be loops, programmed drums, electric piano sounds, or whatever I choose to play from my laptop.
Here’s a look at my screen setup in Ableton Live:
As you can see, the rhodes electric piano channel (which is currently selected) is panned hard-right so it shows up separate from the click track. The advantage of this is that the click track can then be sent to the rest of the band’s monitors (via a send on the mixing board) without going to the main sound system, while anything else from the laptop gets sent separately.
I’m really looking forward to getting a chance to use this rig over the next weeks and months. The ability to drop in programmed elements, live electronics, and use a click track to lock in tempo will be a dynamic new element to our church’s worship music.


