46/52: harmonic study revisited (with iPad & TouchOSC)

I’ve used many tools and made lots of music over the years. This week’s project was a chance to merge the old and the new. One of my first “big” pieces of music was a piece entitled “harmonic study 1.3″, which was the B side of my City Centre Offices 7” release “Tones (for Sarah)”. I made harmonic study 1.3 using a PC with AudioMulch software, and its 10 harmonics device.

This week I decided to play around again with the idea of a purely harmonics-based piece, using the iPad and TouchOSC to create a custom control interface that would let me play the piece like an instrument. Audio and video below:

46/52: harmonic study redux – iPad/TouchOSC overview from chromedecay on Vimeo.

46/52: harmonic study redux by billvanloo

To create this, I used the TouchOSC app on an iPad to control a rack I built in Ableton Live, and aslo an instance of the HarmonyBox plugin.

46/52: Ableton Live - Harmonic Study Redux

46/52: TouchOSC Editor with Harmonic Study Redux layout

44/52: autumn piano music

This week’s project is the rough sketch of a new piano piece I’m working on. I came up with it on Tuesday evening and ran a quick video to capture the idea.

44/52: autumn piano music (rough sketch) from chromedecay on Vimeo.

I recorded a cleaner version with a condensor mic this morning, but it’s really just rough material still that needs to be composed and edited, so the rough sketch will suffice for now.

44/52: autumn piano music recording

This piece was inspired by the autumn season. I captured a nice photo the other day of beautiful orange-gold autumn colors that were interrupted by a short, gentle rain. All this while the sun was still shining…it was a beautiful scene that lasted only a few minutes before the rain was gone and the colors changed.

44/52: autumn rain and sun

43/52: new video – “a bliptronic day”

I realized something partway through last week’s project with the Bliptronic 5000. One of the things that makes the Bliptronic such a fun musical toy is the fact that you can take it everywhere, thanks to its built-in speaker. Within a few days of having it, I’d used it in my studio, in the living room sitting on the piano, and in the dining room while playing guitar. Therefore, I decided to make week 43’s project a video that showed me using the Bliptronic throughout the day in the normal places I go.

43/52: a bliptronic day from chromedecay on Vimeo.

I started out on a beautiful, crisp autumn morning, with just the Bliptronic and a bench.

43/52: a bliptronic day, video still 1

During my late-morning coffee break, I set up the Bliptronic on my desk and played for a few minutes.

43/52: a bliptronic day, video still 2

Later in the day, I retreated to a great space in the school I work at to play for a few more minutes. Since my school used to provide a full range of services, including hearing tests, there are a pair of soundproof rooms, complete with ancient hearing test equipment!

43/52: a bliptronic day, video still

After band rehearsal at church, I snuck in a few minute of playing volume-pedal guitar along with the Bliptronic.

43/52: a bliptronic day, video still 4

I pulled over at a gas station on my way home and rolled down the window to get some night ambience along with the Bliptronic’s tones.

43/52: a bliptronic day, video still 5

Upon arriving home, I propped the Bliptronic up on our piano and accompanied it with some dark minor-key chords.

43/52: a bliptronic day, video still 6

I ended up in my studio, where I brought things to a close. This was a really fun video, made possibly by Kent Kingery’s generous donation of a Bliptronic 5000. Thanks again, Kent!

42/52: Bliptronic 5000!

Last week, my good friend Kent Kingery blew me away by sending me a Bliptronic 5000, which is an incredibly fun little synthesizer+sequencer. This week’s project is an exploration of this great little box.

For starters, here’s a quick proof-of-concept track I made with the Bliptronic.

42/52: bliptronic 5000 test run by billvanloo

To make this, I ran the Bliptronic into Ableton Live, recorded a loop, and then processed that loop in a couple different ways and added some simple drum programming. For example, the bassy part is actually the same loop sent through one of Michael Norris’s excellent SoundMagic Spectral Plugins.

Here are some photos of the Bliptronic arriving and getting put into action. I was surprised at first by just how small it is – even in its box it was only 8 inches square, and the actual machine is smaller than that – maybe 6 inches square!

Bliptronic 5000

I started out by just using the internal speaker (a nice touch – lets you use it anywhere!) and then ended up plugging it straight into the mixer so I could hear it through my studio monitors.

Bliptronic 5000

Blinky lights!

Bliptronic 5000

Before long, I started itching for ways to process it and expand its tonal capabilities. It has 8 built-in sounds, and lets you sequence 8 notes in the key of C major across 8 steps. The limitations of this are actually quite good in many ways, but I wanted to see what I could do with some processing.

I ended up running it into Ableton Live and building a couple of Effects Racks to process the sound. I recorded the audio output of the Bliptronic into Live, then started playing with ways to filter, delay, and otherwise mangle the sounds. It was great fun!

Ableton Live session for 
Bliptronic 5000

I have a few things planned for this box already – a video project is in the planning stage, and there are lots of future possibilities, including turning it into a cheap Monome clone, circuit-bending it (as my friend Michael Una has done), and so on.

Thanks again, Kent! This was a great, fun project!

37/52: Bill Van Loo live performance

The documentation for this project is a little late, but better late than never. On Sunday, September 12, I played a short live set at Bethesda Bible Church’s “Praise in the Parking Lot” event. It was a short 15-minute set, but it was a lot of fun.

Bill Van Loo - Ableton Live set

This was an outdoor event – here are some pictures of the stage and crew:

stage setup

Irvin & Dave: Sound Techs

Stage pass & schedule

Event schedule

Unfortunately, I didn’t get any photos or video of the set, but I did want to post a link to one of the tracks I played. It’s a remix I did a few years ago from Village Thrift. My take on it pushes it into some kind of broken-beat/dub techno thing. Here it is, for your listening and downloading pleasure.

[audio:https://www.chromedecay.org/wp-content/uploads/2010/09/Make-Me-Feel-bill-van-loo-remix.mp3|titles=Make Me Feel (bill van loo remix)]
Make Me Feel (bill van loo remix)

34/52: DIY bottleneck slides

This week’s project was a fun one. I’ve been playing lap-slide guitar for a long time. After college, I put it down for a while, and then picked it back up again 10 years ago or so when I was strictly making electronic music, as a way to make some music that was much more immediate. While my heavy Shubb-Pearse bar works great for a real slide guitar, you really need a hollow slide for playing electric guitar, and I didn’t have one anymore, so I decided to make my own glass bottleneck slide this week.

34/52: DIY bottleneck slide from chromedecay on Vimeo.

If you decide to try this at home, PUT ON EYE PROTECTION before you do anything else! I wear glasses, and I still put a pair of safety glasses over them so I’d have side shields and shatter protection in front of my eyes.

34/52: DIY bottleneck slide

To make my DIY bottleneck slide, I took an old wine bottle, gently clamped it in a vise, and used a Dremel with cutoff wheel to score all around the neck.

34/52: DIY bottleneck slide

34/52: DIY bottleneck slide

34/52: DIY bottleneck slide

34/52: DIY bottleneck slide

After scoring it all around the neck, I gently tapped the body of the bottle with a hammer, and the neck broke off cleanly.

34/52: DIY bottleneck slide

34/52: DIY bottleneck slide

The edges are quite sharp still at this point, so I swapped a grinder/sander attachment onto the Dremel and went to work, smoothing and grinding down the sharp edges so it would be comfortable on my finger.

34/52: DIY bottleneck slide

I made my first one of these on Tuesday night but didn’t take any photos to document the process, so I made another one this afternoon and shot the pictures you see here. I’m planning on giving one of them to another friend who plays electric guitar. Here are the finished products!

34/52: DIY bottleneck slide

32/52: new studio setup, new music

This week, I spent some time moving my music studio into a new space in our house. I know it seems like I just reorganized my studio, but this time it was different – my family has a renter coming to stay with us for a few months, so I’ve temporarily relocated.

32/52: studio reorganization

Along with moving into the new studio space, I spent some time working on updating, editing, and cleaning up some tracks that have been in progress for quite a while now. Here’s a set of 3 snippets from upcoming new tracks. I have not yet decided on how I’ll be releasing this, but it’s getting closer…

32/52: new music snippets by billvanloo

Here are some photos from the process of moving into the new space:

32/52: studio reorganization

32/52: studio reorganization

32/52: studio reorganization

32/52: studio reorganization

One of the things I wanted to make sure of is that I put some artwork on the walls, so I took 2 pieces by my friend Shawn Johnson, and 3 of my photographs, and quickly put them up. They’re not framed, but at least they’re there.

32/52: studio reorganization

32/52: studio reorganization

You can see the full set of photos on Flickr.

26/52: studio cleanup, and some reflections

52 things is now at its official halfway point. Not coincidentally, here’s what my studio looked like at the beginning of this week:

chromedecay music/photo studio cleanup

chromedecay music/photo studio cleanup

After 26 weeks of weekly projects, my creative space has been in pretty active use! For reference, take a look at what it looked like after a similar cleanup in May 2009. This week’s project, then, was to clean it up, organize, and take a few deep breaths in order to be ready for the second half of 2010 and the next sets of projects!

One place that was especially disorganized was my photo supplies. I have a metal crate that I keep small items in – old film cameras, gels for my flashes, spare parts, etc. This crate had gotten pretty out of control:

chromedecay music/photo studio cleanup

My philosophy for cleaning is to first empty everything out:

chromedecay music/photo studio cleanup

After sorting, throwing away, organizing, and generally cleaning, here’s what the crate looks like now:

chromedecay music/photo studio cleanup

Much better! Here’s a photo partway through the process. The studio desk is mostly cleaned off, but there’s still quite a bit of work to do:

chromedecay music/photo studio cleanup

Finally, I finished. There’s still a lot to do (old gear to list on eBay or craigslist, things to donate or get rid of, etc) but it’s much better than it was.

chromedecay music/photo studio cleanup

chromedecay music/photo studio cleanup

You can see the full set of photos on Flickr.

It’s nice to have a clean space to start out the second half of the year in.

This post is set to automatically go live on Friday morning, by which time I will be deep in the woods of Northern Michigan, on a much-anticipated camping expedition. Looking forward to the second half of 2010!

24/52: Church Music Rig

This week’s post is a look inside my music rig for my church. I spent some time this week getting things set up the way I want in order to expand my musical capabilities, so I thought I’d document and share it here for this week’s project.

Here’s the overall rig, once it’s assembled:

church music rig overview

My main role is as a guitarist, the main focus of this rig is playing guitar. You can see my guitar on the left – it’s an Ibanez Artcore A73 semi-hollowbody. It plugs into a Line6 PodXT Live, which in turn runs to a Fender Blues Junior amp. Both the PodXT and the Fender belong to the church, and stay there & are plugged in at all times, so setup is easy – plug in my guitar, turn things on, and I’m ready to play. A mic stand & wireless Shure mic are also set up full-time, since I sing as much as I can (sometimes I’m too busy strictly playing guitar!).

In addition to playing guitar, however, I’m also starting to slowly bring some electronic elements into the mix. As a solo musician, I typically play strictly instrumental electronic music, and finding an appropriate and musically valid way to integrate that part of my music into what I do at church has been a long, slow process. I feel like I’m finally making some progress, however!

On with the rig! As you can see, there’s a shelf under the amp that’s gaff-taped to a keyboard stand, to form a wide, shallow table.

amp, laptop table with cables

Here’s a closeup. 2 USB cables and an Apple power cord also stay gaff-taped to the shelf, along with a custom audio cable I made up. It’s a 1/8″ stereo miniplug on one end, and stereo 1/4 plugs on the other end. The 1/8″ stereo end plugs into my MacBook Pro’s audio output, and the other plugs into 2 separate DI boxes that run into our sound system. One of the USB cables runs to the left-side of the shelf, and is used to connect an M-Audio KeyRig keyboard (a small, lightweight 25-key USB keyboard controller). The other USB cable runs into the PodXT Live, so it can be used as an audio input into Ableton Live.

cables (detail)

Having all this set up permanently means that setup is extremely fast. I pop the KeyRig out of my bag, plug it into its USB cable, set my laptop on the shelf, plug in 2 USB cables & the audio cable, then connect my power supply to the cord. Done!

The bottom of the rig is a little messy. On the top left, you can see two separate DI boxes, which run my laptop’s signal to two separate channels on the mixing board. You can also see the way the PodXT Live fits into the space of the keyboard stand. This is important because it helps my rig take up a smaller amount of space, and keeps everything together nicely. We don’t have a lot of room on the platform (lots of musicians plus choir) so every inch counts!

Floor view: DI boxes, PodXT Live, cables

Now that I have my 1/8″ to stereo 1/4″ cables, I’m able to split the stereo audio output from my laptop into 2 discrete channels. The left channel strictly carries a click track (metronome), while the right channel carries everything else, which might be loops, programmed drums, electric piano sounds, or whatever I choose to play from my laptop.

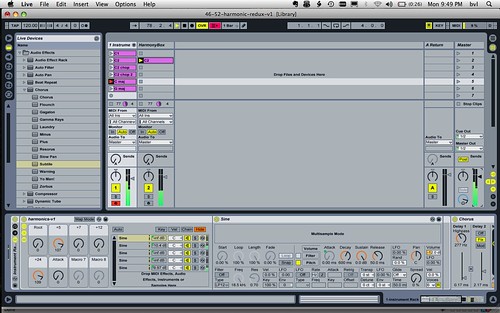
Here’s a look at my screen setup in Ableton Live:

Ableton Live setup - church music rig

As you can see, the rhodes electric piano channel (which is currently selected) is panned hard-right so it shows up separate from the click track. The advantage of this is that the click track can then be sent to the rest of the band’s monitors (via a send on the mixing board) without going to the main sound system, while anything else from the laptop gets sent separately.

I’m really looking forward to getting a chance to use this rig over the next weeks and months. The ability to drop in programmed elements, live electronics, and use a click track to lock in tempo will be a dynamic new element to our church’s worship music.