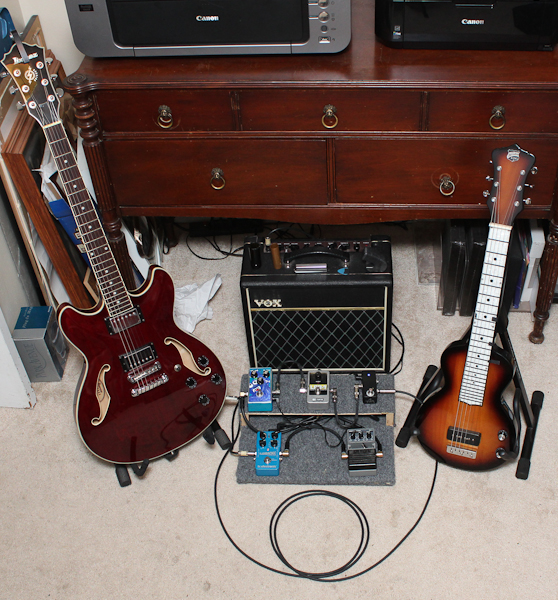
Since I’ve been stalled on working on my new album’s worth of material for a while (over a year, actually!), I thought it would be fun to get inspiration by pulling some gear together in a new way and adding a few new pieces together. Hence, a new pedalboard for guitar!
Here’s a video overview, and below that are some detail photos of the new setup.
Pedalboard Photo Gallery
Click photos for larger view.
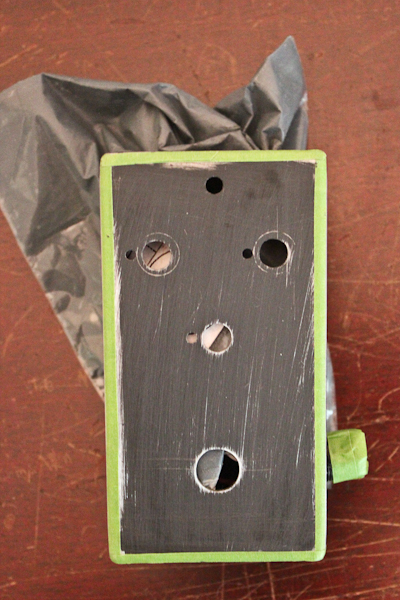
Big Muff Clone before painting
Big Muff Clone gets taped off before painting
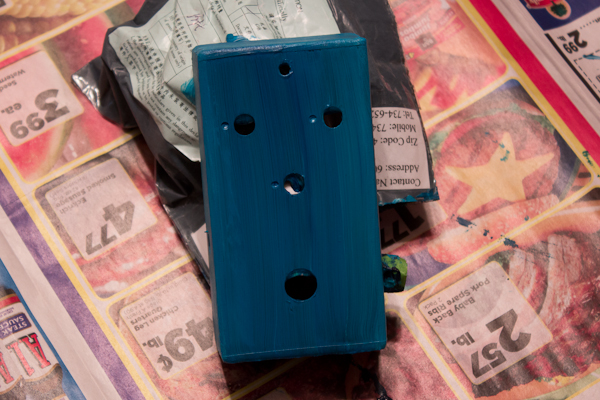
First coat of paint…
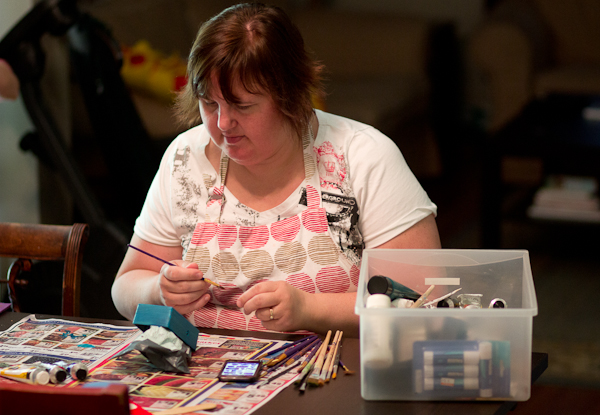
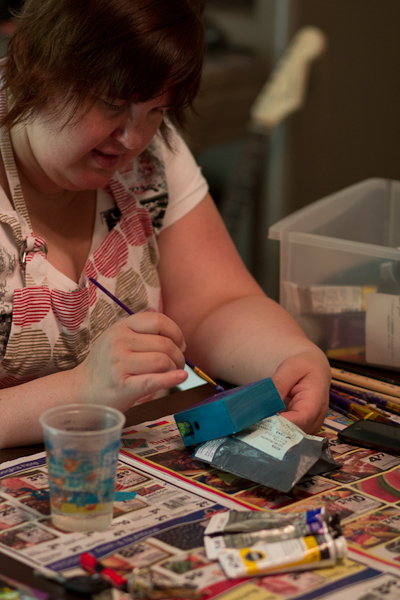
Sarah Van Loo painting the Big Muff clone
Sarah Van Loo painting the Big Muff clone
Sarah Van Loo painting the Big Muff clone
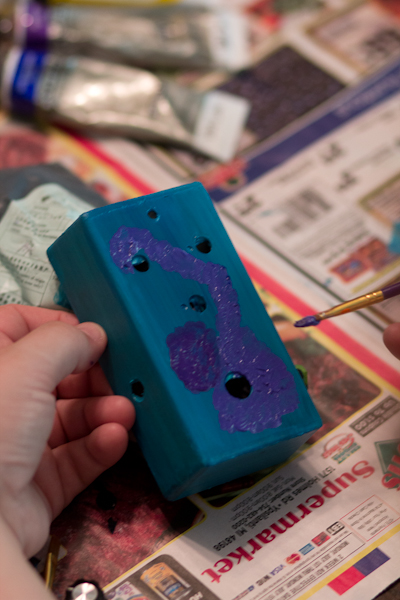
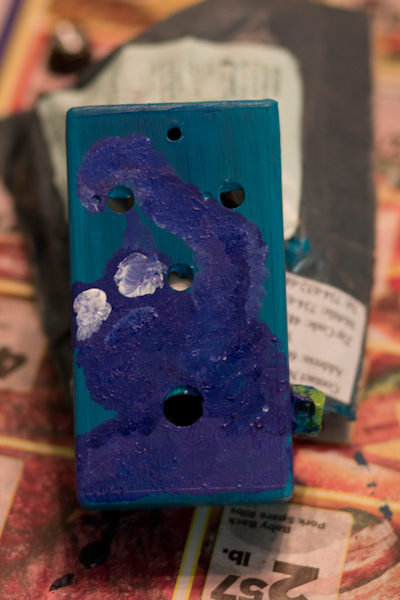
Big Muff clone almost done…
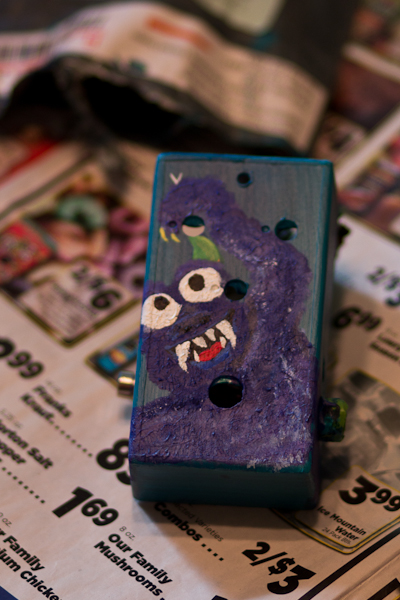
The finished “Purple Fuzzy Monster” Big Muff clone, handpainted by Sarah Van Loo
The finished “Purple Fuzzy Monster” Big Muff clone, handpainted by Sarah Van Loo
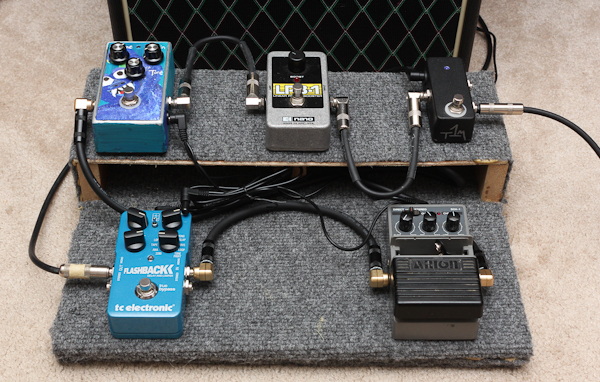
Here are some recent projects I’ve been working on. After receiving a Big Muff guitar pedal from my cousin Jamie (from The Press Delete), I started thinking more about building up a pedalboard again for my guitar playing. I’ve been quite happy with the Line 6 PodXT Live, but there’s something special about guitar pedals: they typically do one thing, and do it well.
As such, I got out my case of unused guitar pedals and started going through them. I ended up selling one (an old graphic EQ pedal that I never used any more) and looked more closely at the other two. I have 3 pedals currently: the Big Muff clone, an Arion SAD-1 analog delay pedal, and an Arion SCH-1 chorus pedal. Combined with my practice amp (a Vox Pathfinder 15R), I’d have a fuzztone, chorus, delay, tremolo (built into the amp, and quite nice!) and spring reverb (also built into the amp, and also really nice!). This suits my style of playing pretty well, so I figured it was worth doing a bit of repair work to get the two Arion pedals in good shape.
Arion SCH-1 analog chorus, in need of a new 9V battery clip
Arion SAD-1 analog delay, with a flaky “repeat” potentiometer and bad 9V battery clip
Both Arion pedals needed new 9V battery clips, which is an easy repair – snip off the old ends, trim a new Radio Shack 9V clip to size, twist the wires together, and solder. Easily done:
Arion SCH-1 analog chorus: 9V clip fixed!
I also had to remove the bad potentiometer from the SAD-1 analog delay pedal, so I did that while repairing the 9V clip:
Arion SAD-1 analog delay: 9V clip fixed, bad potentiometer removed
I now have to locate a source for a new potentiometer that fits the SAD-1, which may prove difficult. Worst case, I end up getting a new enclosure for the pedal and rehousing it completely. That wouldn’t be all bad, as the existing enclosure is plastic, but it would mean spending more money and time on this little guy. The analog delay is really nice, though, so I think it will be worth it in the end.
I also started thinking about the Bliptronic 5000 music box (see related 52 things posts “42/52: Bliptronic 5000!” and “43/52: new video – ‘a bliptronic day’“). I like it a lot, but the 1/8″ miniplug output means having to use a cable with an adapter to change it to 1/4″ if I’m going to plug it into a mixer or my audio interface. I think having a 1/4” output jack instead might be nice, so I opened it up to see how feasible it is:
Verdict? It’s incredibly tight in there. I might be able to squeeze a 1/4″ jack in there, but it’s going to be tight. I may have to re-route the headphone output if I do put one in. I’m still undecided about whether or not I’ll pursue that. Lots of other mods are possible, so I may wait before tackling a more ambitious project with the bliptronic and roll the 1/4″ output into a larger project.
This week’s project was a fun one. I’ve been playing lap-slide guitar for a long time. After college, I put it down for a while, and then picked it back up again 10 years ago or so when I was strictly making electronic music, as a way to make some music that was much more immediate. While my heavy Shubb-Pearse bar works great for a real slide guitar, you really need a hollow slide for playing electric guitar, and I didn’t have one anymore, so I decided to make my own glass bottleneck slide this week.
If you decide to try this at home, PUT ON EYE PROTECTION before you do anything else! I wear glasses, and I still put a pair of safety glasses over them so I’d have side shields and shatter protection in front of my eyes.
To make my DIY bottleneck slide, I took an old wine bottle, gently clamped it in a vise, and used a Dremel with cutoff wheel to score all around the neck.
After scoring it all around the neck, I gently tapped the body of the bottle with a hammer, and the neck broke off cleanly.
The edges are quite sharp still at this point, so I swapped a grinder/sander attachment onto the Dremel and went to work, smoothing and grinding down the sharp edges so it would be comfortable on my finger.
I made my first one of these on Tuesday night but didn’t take any photos to document the process, so I made another one this afternoon and shot the pictures you see here. I’m planning on giving one of them to another friend who plays electric guitar. Here are the finished products!
This week, I spent some time moving my music studio into a new space in our house. I know it seems like I just reorganized my studio, but this time it was different – my family has a renter coming to stay with us for a few months, so I’ve temporarily relocated.
Along with moving into the new studio space, I spent some time working on updating, editing, and cleaning up some tracks that have been in progress for quite a while now. Here’s a set of 3 snippets from upcoming new tracks. I have not yet decided on how I’ll be releasing this, but it’s getting closer…
Here are some photos from the process of moving into the new space:
One of the things I wanted to make sure of is that I put some artwork on the walls, so I took 2 pieces by my friend Shawn Johnson, and 3 of my photographs, and quickly put them up. They’re not framed, but at least they’re there.
This project is one that has been in my “to do” list for well over a year: a servo-powered pan/tilt camera mount!
My intention in making this is to have something that I can use for several purposes. First, it seems like it would work great on my DIY Camera Crane (although I haven’t tried it yet, just having finished the pan/tilt mount today). In addition, I love the idea of being able to put a camera on this and having it either randomly or programatically panning and tilting while I’m doing something else (like playing music).
I was definitely inspired by this build, featured in Make Magazine, Volume 19, entitled “MIDI Camera Control”:
I liked the pre-made brackets they mentioned, but figured I’d try my hand at fabricating my own first, partly to save money and partly because it seemed pretty straightforward.
To start out, I decided to build a quick prototype out of Lego, powered by a Lego Mindstorms NXT motor & brick. Because Lego is so easy to work with, I was able to make a quick prototype in an evening:
Once I had that done, it was time to start the real build. I had a couple of servos already, as well as an Arduino board, and my plan was to use the Arduino to control & power the servos. Servos (formally “servomotors”) are small electric motors whose position can be controlled, so they’re perfect for this project.
I wasn’t sure what to build the bracket itself out of, but I quickly settled on using Erector, as it bridged the gap nicely between “fast to build with” and “durable enough to support a camera”. The physical build came together pretty smoothly. Here are some photos from that process:
After I’d assembled the bracket and servos, I connected them to the Arduino and started trying to figure out the code to drive them. I’m embarrassed to say that I wasted a day trying to drive the servos from the Arduino’s analog in pins (doh!) instead of the digital output pins. After a few hours down the drain, I gave up and started afresh the next day, and quickly found this helpful video from Make Magazine, which described using servos with the Arduino:
I got the servos hooked up, and did some quick coding in the Arduino environment, along with building the necessary circuit to hook the servos up to the Arduino itself.
Before too long (and after much consulting of the arduino.cc website, especially this SingleServoExample page), I had the Arduino controlling the servos and moving the camera around!
Unfortunately, I had chosen to use continuous servos at first. A continuous servo can spin infinitely in either direction, whereas a standard servo has a limited range. The difference in programming these is that you can tell a standard servo to move from 0 degrees to 180 degrees, where with a continuous servo, you only have control over the speed and direction the motor is turning.
I quickly realized I needed to swap my continuous servos for standard ones, which I luckily had a pair of as well. Once that was done, it became much easier to tell the pan/tilt mount to point in a particular direction.
Unfortunately, I don’t have any video available yet from the updated bracket, as I’ve just finished it. I’ll get some together and update this post once I do. However, I’m quite excited by the progress I made on this project!
My next steps are to get some good controls built and in place for the pan/tilt bracket – either physical controls (like knobs) or computer-based controls, likely built in Processing. That way, I can either manually control it or automate it to pan and tilt while I’m doing other things. Also, the Erector is a bit wobbly, and it would be great to replace it with a bracket made from flat aluminum stock, or something similar. MicroRax might be perfect, but it’s expensive.
52 things is now at its official halfway point. Not coincidentally, here’s what my studio looked like at the beginning of this week:
After 26 weeks of weekly projects, my creative space has been in pretty active use! For reference, take a look at what it looked like after a similar cleanup in May 2009. This week’s project, then, was to clean it up, organize, and take a few deep breaths in order to be ready for the second half of 2010 and the next sets of projects!
One place that was especially disorganized was my photo supplies. I have a metal crate that I keep small items in – old film cameras, gels for my flashes, spare parts, etc. This crate had gotten pretty out of control:
My philosophy for cleaning is to first empty everything out:
After sorting, throwing away, organizing, and generally cleaning, here’s what the crate looks like now:
Much better! Here’s a photo partway through the process. The studio desk is mostly cleaned off, but there’s still quite a bit of work to do:
Finally, I finished. There’s still a lot to do (old gear to list on eBay or craigslist, things to donate or get rid of, etc) but it’s much better than it was.
It’s nice to have a clean space to start out the second half of the year in.
This post is set to automatically go live on Friday morning, by which time I will be deep in the woods of Northern Michigan, on a much-anticipated camping expedition. Looking forward to the second half of 2010!
This week’s post is a look inside my music rig for my church. I spent some time this week getting things set up the way I want in order to expand my musical capabilities, so I thought I’d document and share it here for this week’s project.
Here’s the overall rig, once it’s assembled:
My main role is as a guitarist, the main focus of this rig is playing guitar. You can see my guitar on the left – it’s an Ibanez Artcore A73 semi-hollowbody. It plugs into a Line6 PodXT Live, which in turn runs to a Fender Blues Junior amp. Both the PodXT and the Fender belong to the church, and stay there & are plugged in at all times, so setup is easy – plug in my guitar, turn things on, and I’m ready to play. A mic stand & wireless Shure mic are also set up full-time, since I sing as much as I can (sometimes I’m too busy strictly playing guitar!).
In addition to playing guitar, however, I’m also starting to slowly bring some electronic elements into the mix. As a solo musician, I typically play strictly instrumental electronic music, and finding an appropriate and musically valid way to integrate that part of my music into what I do at church has been a long, slow process. I feel like I’m finally making some progress, however!
On with the rig! As you can see, there’s a shelf under the amp that’s gaff-taped to a keyboard stand, to form a wide, shallow table.
Here’s a closeup. 2 USB cables and an Apple power cord also stay gaff-taped to the shelf, along with a custom audio cable I made up. It’s a 1/8″ stereo miniplug on one end, and stereo 1/4 plugs on the other end. The 1/8″ stereo end plugs into my MacBook Pro’s audio output, and the other plugs into 2 separate DI boxes that run into our sound system. One of the USB cables runs to the left-side of the shelf, and is used to connect an M-Audio KeyRig keyboard (a small, lightweight 25-key USB keyboard controller). The other USB cable runs into the PodXT Live, so it can be used as an audio input into Ableton Live.
Having all this set up permanently means that setup is extremely fast. I pop the KeyRig out of my bag, plug it into its USB cable, set my laptop on the shelf, plug in 2 USB cables & the audio cable, then connect my power supply to the cord. Done!
The bottom of the rig is a little messy. On the top left, you can see two separate DI boxes, which run my laptop’s signal to two separate channels on the mixing board. You can also see the way the PodXT Live fits into the space of the keyboard stand. This is important because it helps my rig take up a smaller amount of space, and keeps everything together nicely. We don’t have a lot of room on the platform (lots of musicians plus choir) so every inch counts!
Now that I have my 1/8″ to stereo 1/4″ cables, I’m able to split the stereo audio output from my laptop into 2 discrete channels. The left channel strictly carries a click track (metronome), while the right channel carries everything else, which might be loops, programmed drums, electric piano sounds, or whatever I choose to play from my laptop.
Here’s a look at my screen setup in Ableton Live:
As you can see, the rhodes electric piano channel (which is currently selected) is panned hard-right so it shows up separate from the click track. The advantage of this is that the click track can then be sent to the rest of the band’s monitors (via a send on the mixing board) without going to the main sound system, while anything else from the laptop gets sent separately.
I’m really looking forward to getting a chance to use this rig over the next weeks and months. The ability to drop in programmed elements, live electronics, and use a click track to lock in tempo will be a dynamic new element to our church’s worship music.
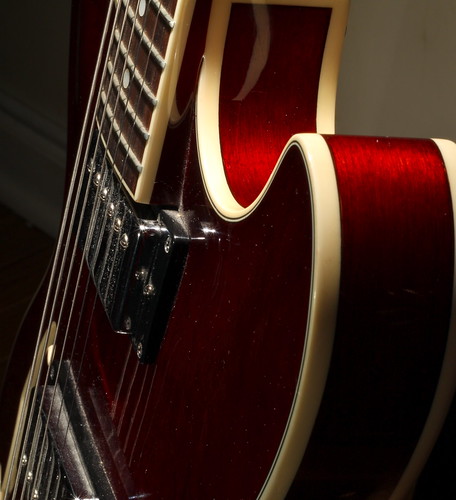
This week’s post is late, for several reasons. I did the majority of the work on Wednesday night, shooting photos for this week’s project, but fell asleep while trying to edit them on Thursday and Friday nights. After finishing up the edits Saturday morning, our house’s power went out due to a storm! However, this week’s project is finally posted: it’s a set of photos of a Gibson SJ Junior guitar.
I shot these photos for several reasons. The guitar in the pictures above is owned by my father, who’s had it for over 40 years. It is a beautiful vintage guitar, and is actually what I learned to play guitar on when I was in college! However, my father has decided it’s time to part with it, to help fund the purchase of a different guitar, so I agreed to sell it for him.
Along with taking the standard eBay photos, I figured I’d take a few more interesting photos. The two at the top are my favorites.
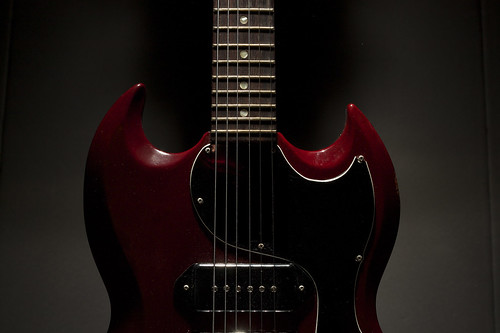
I had taken a few photos of my guitar a while back, and really liked how this one came out:
This was my basic template for the first SG shot at the top of the post. It’s a single flash, pointed straight down at the guitar from above, and no real direct light from the front. I
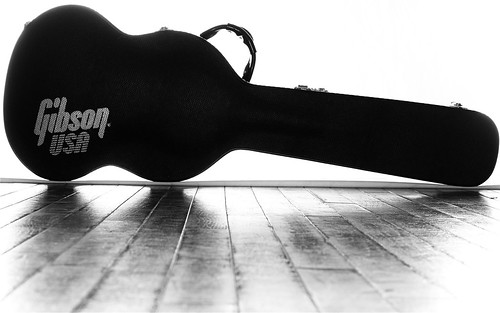
I also really liked this shot, of the guitar in its case. This was done with a bedsheet gaff-taped to the wall, and the guitar case positioned right at the front of the sheet. The hardwood floor in front of it gets some reflection – I wasn’t entirely happy with how much light hit the floor, but it turned out OK.
I’m now getting ready to sell the guitar, but it was a lot of fun taking pictures of it before it goes out the door. You can see the full set of photos here:
All photos were shot with a Canon T1i with 50mm f/1.8 lens. Flashes used were a Vivitar 285 and a Sunpak 322.
Along the way, I learned a bit more about my workflow with the Canon T1i. I’ve had this camera for about 2 months now, but have not really shot much RAW footage with it – I’m usually shooting strictly JPG. This was a nice chance to shoot RAW+JPG in a controlled environment, and figure out the necessary steps for using the CR2 RAW files the T1i produces. However, Photoshop CS3 will not read .cr2 files, so I have to figure out what my options are there – possibly a newer version of the DNG Converter from Adobe, or I may need to start using Canon’s RAW software. I ended up doing all my work on the JPG versions of these photos.
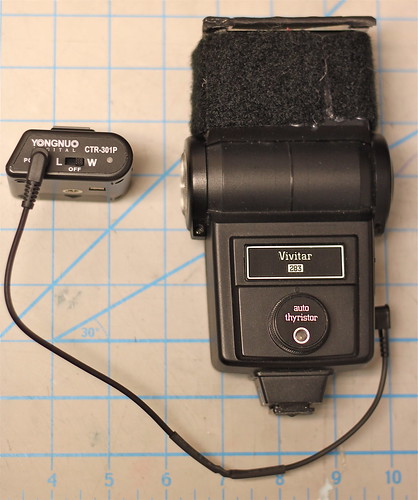
This week’s post is both late (I usually post on Friday) and less complete than I’d hoped. However, here it is: a DIY Vivitar to 2.5mm sync cable for the CTR-301p flash triggers.
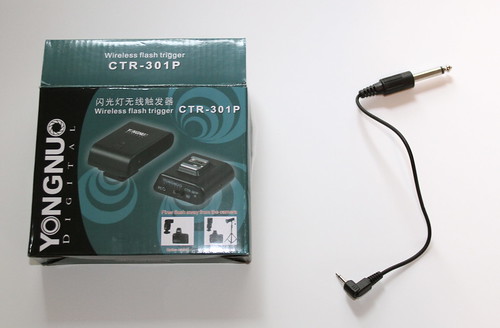
I bought a new set of flash triggers several months ago, the Yongnuo CTR-301p. They are a cheap set of triggers, and they ship directly from Hong Kong, which means it takes close to a month to receive them. However, I was originally sent the wrong style of triggers – I need a Canon-specific transmitter, and I was sent a Sony/Minolta version.
After some haggling, I was able to re-order the correct item at a reduced price, and was hoping they would finally arrive this week in time for this 52 things post. Alas, they did not, but I was able to make some progress toward being able to use them as I intend. My main flashes are the Vivitar 285 and 283, both of which are quite old and have a high trigger voltage. I’ve heard conflicting reports about how much voltage the CTR-301p triggers are built to handle – some reports say less than 12V, and some say they’re safe up to 300V. That’s a big difference, and I’d prefer not to fry my new triggers, so I built a DIY Vivitar-to-2.5mm cable instead of using the hotshoe connection.
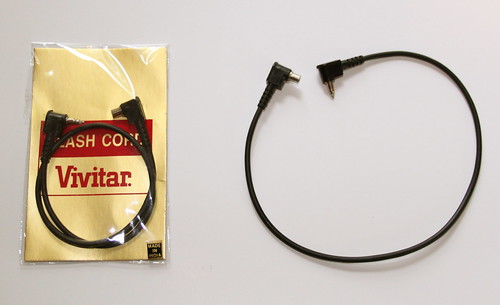
Here’s a standard Vivitar to PC sync cable. The Vivitar side is a weird, proprietary connector, which is what necessitated making a custom cable.
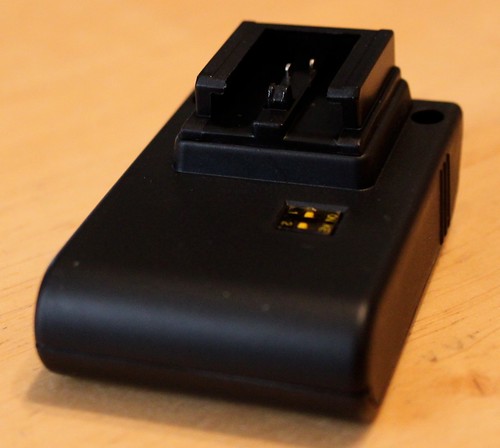
The CTR-301p comes with this cable – a short 2.5mm to 1/4″ cable, where the 2.5mm side plugs into the CTR-301p receiver.
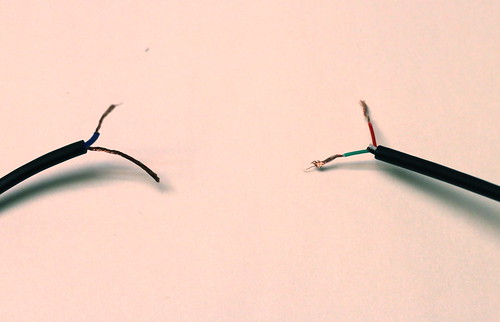
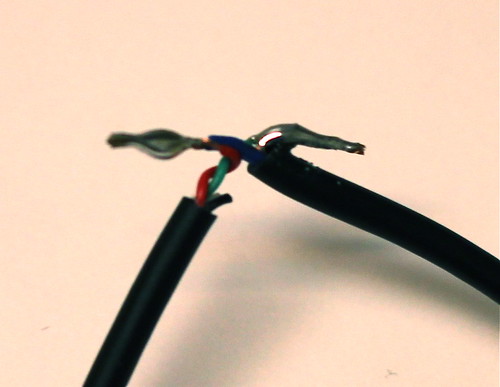
In order to make this, I basically hacked the ends I didn’t want off both cables, and soldered them both together.
The one somewhat unusual part of making this cable is that the mono 2.5mm cable had 4 wires for some reason – usually this would only have 2 wires. I took a lucky guess that the green wire was ground, and the red wire was hot, and it worked out the first time – the green wire from the 2.5mm cable connected to the bare ground wire from the Vivitar cable, and the red wire from the 2.5mm cable connected to the blue wire from the Vivitar cable.
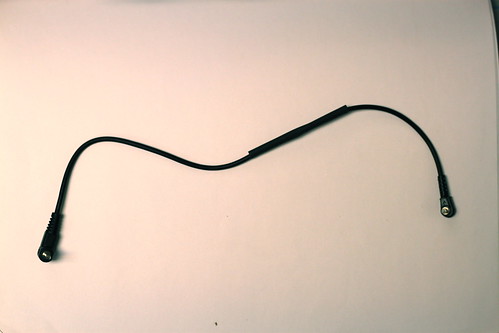
Once it was done, all that was left was to slide some heatshrink tubing over the whole thing to make it nice and tidy:
Since I don’t have the proper Canon transmitter yet, I wasn’t able to test this on the camera, but luckily the CTR-301p’s transmitter has a manual test button, and it worked properly, popping the flash every time I pushed the test button. Here’s looking forward to getting the correct version soon!
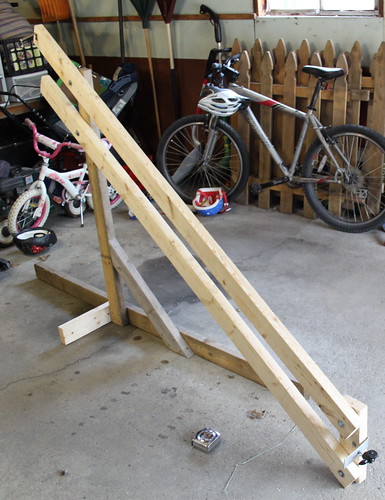
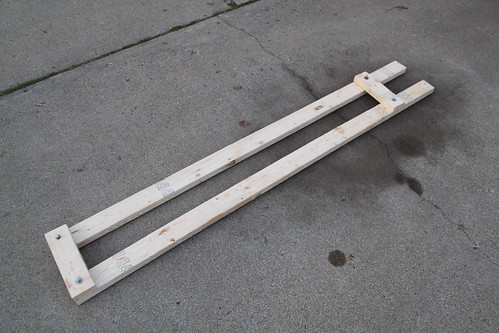
I basically followed the same idea as the colvins.ca version mentioned above. This is very much a version 1.0 project, however, as there are a number of things that could be much improved. For one thing, the colvins.ca version uses 2″x2″ lumber, and when I picked up lumber for this project, I got 2″x4″ lumber. That makes the crane arm twice as heavy as it could be, although maybe it resists deflection (bending) more, too. There are other future improvements I’ll mention along the way.
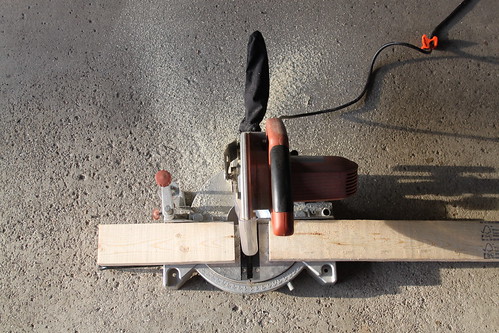
To start with this project, I measured out the 2x4s and cut off a 14″ section from each one, so the crane arm is just under 7 feet long. Then I drilled holes in the long sections, to allow the whole arm assembly to be bolted together.
After I had assembled the crane arm (using a small piece on the end to hold the whole thing together temporarily), I built a quick-and-easy stand. The colvins.ca article mentioned using a work light stand (which I have!) but it wasn’t working for me – the stand wasn’t sturdy enough, and I didn’t feel like fabricating the necessary bracket, so I just built a version using 2×4 lumber.
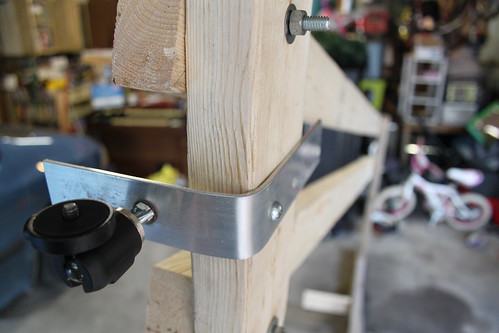
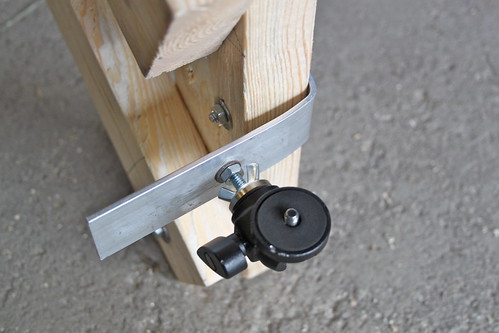
For the end where the camera attaches, I used a piece of flat aluminum stock, bent at a 90-degree angle and bolted to the end of the crane arm. A standard 1/4 x 20 bolt comes through the end, and a Manfrotto Micro Ball head attaches to that to give the camera a forward-looking orientation.
I didn’t get much of a chance to shoot test footage yet, as I only finished it late this afternoon, but I did get a couple of quick shots before I had to put it away. You can see the test footage here:
Things that could be much improved:
The stand is pretty wobbly – the vertical 2×4 is somewhat warped, and it only has ground support on one side.
It would be great to make the whole thing much more portable. I’m thinking of something perhaps made from PVC pipe or something similar that could be quickly assembled, but broken down into smaller pieces for transportation (4-foot long sections at maximum would make this much easier to take other places).
The bracket that the camera attaches to is pretty bare-bones; it’s not that stable, and it would be nice if the bolt that the ballhead and camera attach to was vertically oriented.
There’s no way to see the camera’s output, so a small video monitor would be a good addition
Long-term, I’d like to use pan/tilt brackets and servomotors to make the camera remotely controllable!
For now, I’m quite pleased with this version 1.0 jib/crane, and I’m looking forward to shooting some more interesting video with it.


")