On Thursday, I had an opportunity to go out shooting photographs with a friend of mine, Irvin. We met up in the Depot Town area of Ypsilanti, and, as it happened, the Thursday night car show was in full swing. Every Thursday during the summer, the section of Cross Street that makes up Depot Town is closed off, and filled with vintage cars:
With such a huge selection of interesting cars to photograph, Irvin and I were on our way, exchanging ideas and enjoying the chance to hang out.
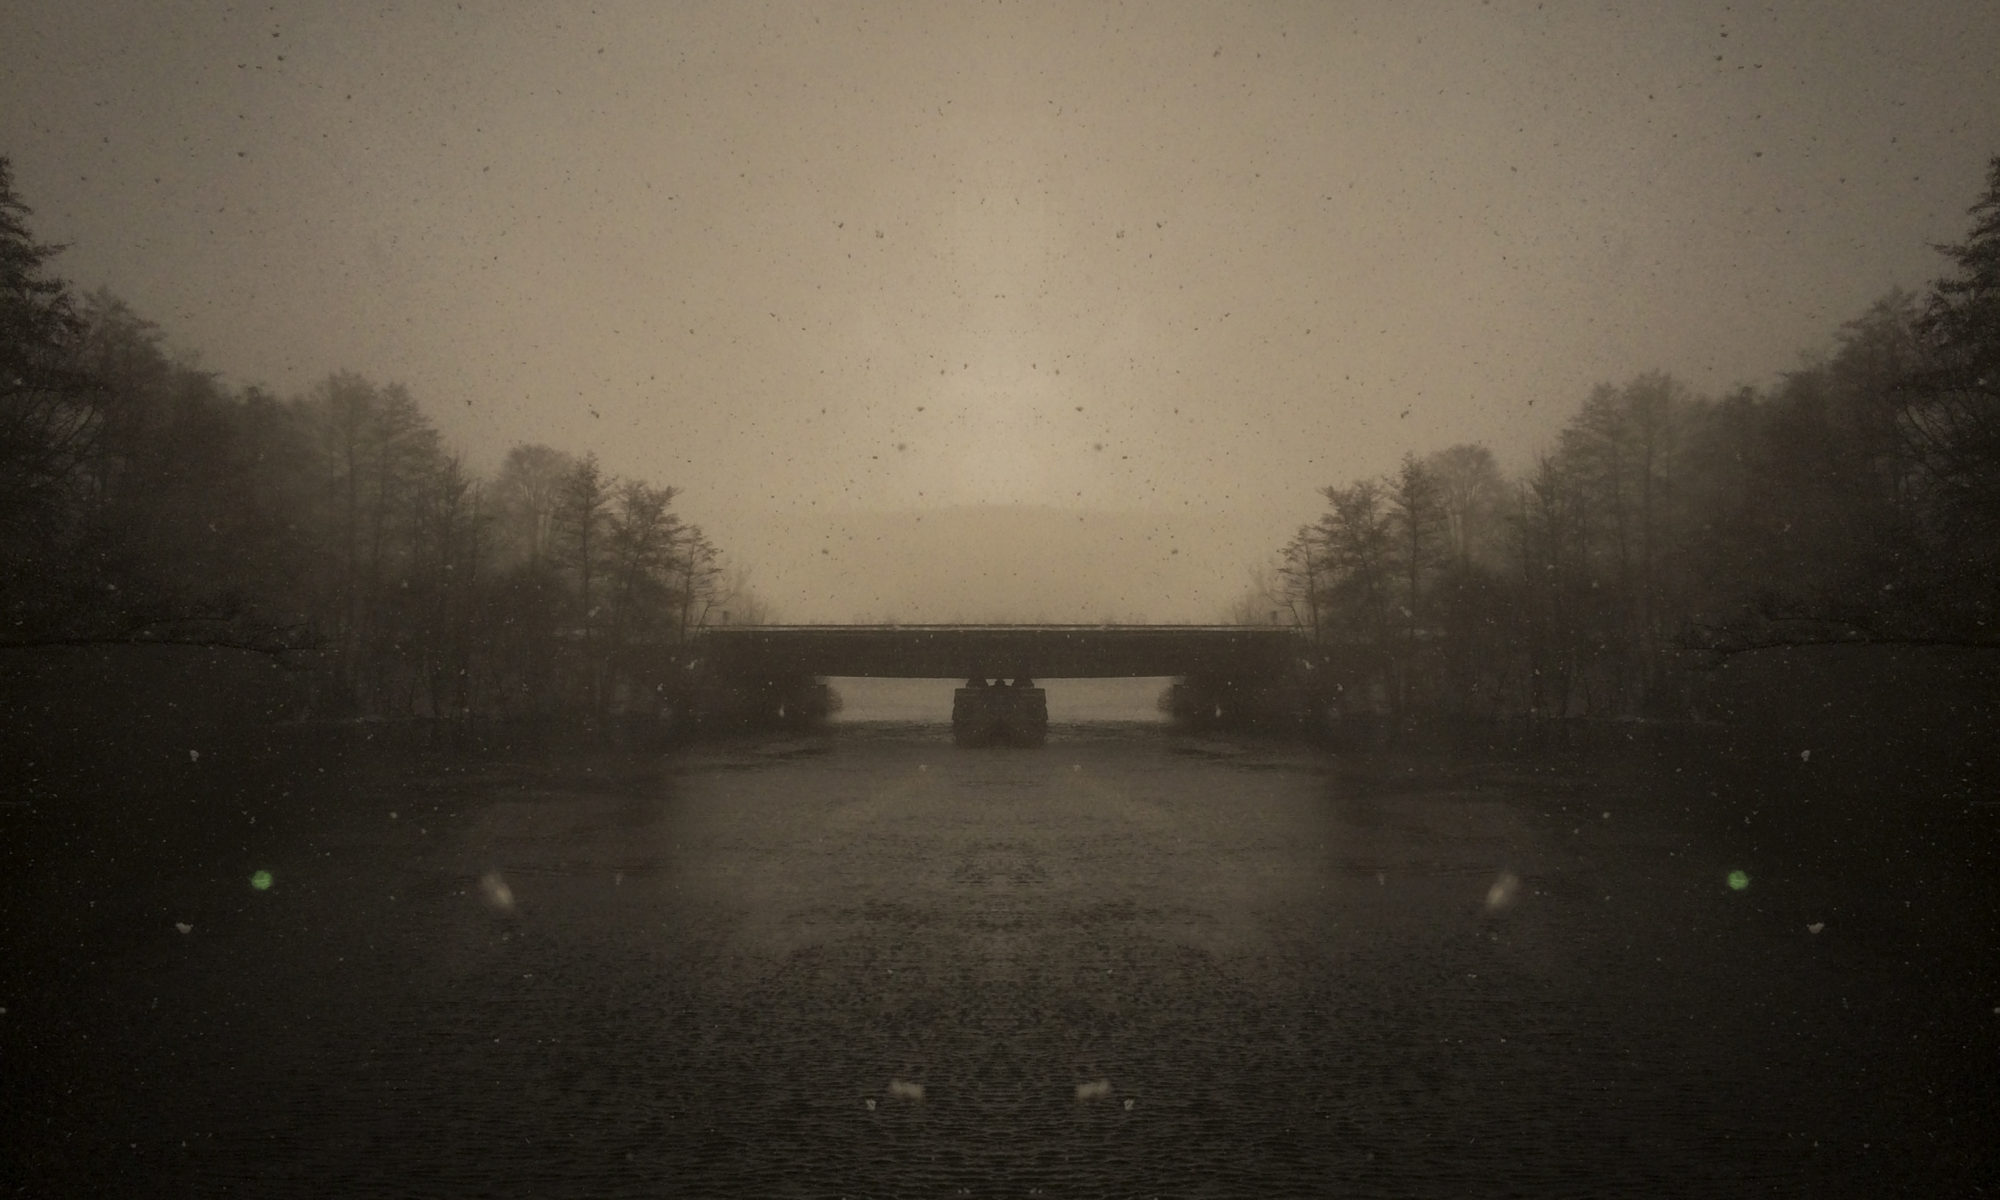
As the sun set and the light started to fade, I realized I might have an opportunity to pull off a shot I’d had in my head for quite a while now. I really enjoy making long-exposure photos (see some examples on Flickr), and I’d been interested in combining that with my interest in portraiture. Irvin agreed to participate, so we hiked up the hill to Huron Street, and Irvin graciously allowed me to use his extremely nice tripod (thanks again!). I quickly got a baseline exposure of 5 seconds, which let me see the light trails from passing cars as well as some natural light from the skyline:
I’d brought along a small hotshoe flash and my radio triggers, so I combined a CTO-gelled flash (to match the orangey light of the background scene) with a 5-second exposure, and turned out this portrait:
The flash froze Irvin as he stood there, and the long exposure time let the light trails burn in nicely. I did a couple more long exposures as Irvin tried some of his own, and then we called it a night.
I’ve been massively influenced by a number photographers over the past year or so, and none more than Zach Arias. His photo critiques, blog posts, and teaching sessions have been a great source of inspiration and learning, and have helped shape my ideas about what I want to do as a photographer. More recently, I’ve been reading David duChemin’s “VisionMongers: Making a Life and a Living in Photography”, which nicely compliments Zach’s ideas. David’s book makes you really focus on what you’re about as a photographer, and it both inspired and shaped this recent portfolio update.
This week, I spent some time moving my music studio into a new space in our house. I know it seems like I just reorganized my studio, but this time it was different – my family has a renter coming to stay with us for a few months, so I’ve temporarily relocated.
Along with moving into the new studio space, I spent some time working on updating, editing, and cleaning up some tracks that have been in progress for quite a while now. Here’s a set of 3 snippets from upcoming new tracks. I have not yet decided on how I’ll be releasing this, but it’s getting closer…
Here are some photos from the process of moving into the new space:
One of the things I wanted to make sure of is that I put some artwork on the walls, so I took 2 pieces by my friend Shawn Johnson, and 3 of my photographs, and quickly put them up. They’re not framed, but at least they’re there.
This project is one that has been in my “to do” list for well over a year: a servo-powered pan/tilt camera mount!
My intention in making this is to have something that I can use for several purposes. First, it seems like it would work great on my DIY Camera Crane (although I haven’t tried it yet, just having finished the pan/tilt mount today). In addition, I love the idea of being able to put a camera on this and having it either randomly or programatically panning and tilting while I’m doing something else (like playing music).
I was definitely inspired by this build, featured in Make Magazine, Volume 19, entitled “MIDI Camera Control”:
I liked the pre-made brackets they mentioned, but figured I’d try my hand at fabricating my own first, partly to save money and partly because it seemed pretty straightforward.
To start out, I decided to build a quick prototype out of Lego, powered by a Lego Mindstorms NXT motor & brick. Because Lego is so easy to work with, I was able to make a quick prototype in an evening:
Once I had that done, it was time to start the real build. I had a couple of servos already, as well as an Arduino board, and my plan was to use the Arduino to control & power the servos. Servos (formally “servomotors”) are small electric motors whose position can be controlled, so they’re perfect for this project.
I wasn’t sure what to build the bracket itself out of, but I quickly settled on using Erector, as it bridged the gap nicely between “fast to build with” and “durable enough to support a camera”. The physical build came together pretty smoothly. Here are some photos from that process:
After I’d assembled the bracket and servos, I connected them to the Arduino and started trying to figure out the code to drive them. I’m embarrassed to say that I wasted a day trying to drive the servos from the Arduino’s analog in pins (doh!) instead of the digital output pins. After a few hours down the drain, I gave up and started afresh the next day, and quickly found this helpful video from Make Magazine, which described using servos with the Arduino:
I got the servos hooked up, and did some quick coding in the Arduino environment, along with building the necessary circuit to hook the servos up to the Arduino itself.
Before too long (and after much consulting of the arduino.cc website, especially this SingleServoExample page), I had the Arduino controlling the servos and moving the camera around!
Unfortunately, I had chosen to use continuous servos at first. A continuous servo can spin infinitely in either direction, whereas a standard servo has a limited range. The difference in programming these is that you can tell a standard servo to move from 0 degrees to 180 degrees, where with a continuous servo, you only have control over the speed and direction the motor is turning.
I quickly realized I needed to swap my continuous servos for standard ones, which I luckily had a pair of as well. Once that was done, it became much easier to tell the pan/tilt mount to point in a particular direction.
Unfortunately, I don’t have any video available yet from the updated bracket, as I’ve just finished it. I’ll get some together and update this post once I do. However, I’m quite excited by the progress I made on this project!
My next steps are to get some good controls built and in place for the pan/tilt bracket – either physical controls (like knobs) or computer-based controls, likely built in Processing. That way, I can either manually control it or automate it to pan and tilt while I’m doing other things. Also, the Erector is a bit wobbly, and it would be great to replace it with a bracket made from flat aluminum stock, or something similar. MicroRax might be perfect, but it’s expensive.
This week’s project for 52 things was a pair of projects, both photography-based. The first is a set called “vacation colors”, the second is a set of portraits I shot for friends of mine.
The second set of photos was a self-assignment, where I asked friends of mine to model for me and help me improve my portrait photography. My friends Jeannie and Rex graciously agreed.
Here’s one of Jeannie, with a CTO’d flash helping out the golden light of the sun setting.
Before I went into the shoot, I had an idea of a shot I knew I wanted. Rex is quite a character, and he owns an old police cruiser. I wanted a shot of him with the cruiser that made him look like the long arm of the law, and here’s what I ended up with:
Setup shot:
Finally, a couple of simple black-and-white portraits. One flash behind them to act as a rim light (you can really see this on Jeannie’s hair), another in front to light the face.
52 things is now at its official halfway point. Not coincidentally, here’s what my studio looked like at the beginning of this week:
After 26 weeks of weekly projects, my creative space has been in pretty active use! For reference, take a look at what it looked like after a similar cleanup in May 2009. This week’s project, then, was to clean it up, organize, and take a few deep breaths in order to be ready for the second half of 2010 and the next sets of projects!
One place that was especially disorganized was my photo supplies. I have a metal crate that I keep small items in – old film cameras, gels for my flashes, spare parts, etc. This crate had gotten pretty out of control:
My philosophy for cleaning is to first empty everything out:
After sorting, throwing away, organizing, and generally cleaning, here’s what the crate looks like now:
Much better! Here’s a photo partway through the process. The studio desk is mostly cleaned off, but there’s still quite a bit of work to do:
Finally, I finished. There’s still a lot to do (old gear to list on eBay or craigslist, things to donate or get rid of, etc) but it’s much better than it was.
It’s nice to have a clean space to start out the second half of the year in.
This post is set to automatically go live on Friday morning, by which time I will be deep in the woods of Northern Michigan, on a much-anticipated camping expedition. Looking forward to the second half of 2010!
This week’s post has been sitting in WordPress as a draft for almost 6 months – that’s how long I’ve been planning this one. This week, I did a photoshoot for Vertical Ambition Dance Company, a group of extremely talented dancers who are rooted in breakdance, hip-hop, ballet, and modern.
I first approached Jared, one of the VADC founders, about shooting photos of the company back in December of 2009, and it finally worked out to do a shoot this Monday evening. I knew I wanted to do this for free, as a creative collaboration (for a great read about this way of working, read this Strobist article about working for free).
I was lucky to have had a great chance to watch 3 or 4 hours of the “Studio Photography with Zach Arias” workshop on Creative Live as it was re-aired on Sunday night, so I was extremely inspired going into the shoot. I’ve been a big fan of Zach’s photography for a long time, as well as the sharing and teaching he does.
Before I ever picked up the camera, I looked at Flickr months ago for inspiration. Here are a couple of shots that I dug:
(PLEASE NOTE: The two photos above were NOT taken by me – they are photos from others on Flickr!).
Several things I noticed right away about many of the breakdance photos were extreme wide-angle shots, dramatic poses, and lots of low and close shooting angles. I knew I wanted to nail some of these, but also wanted some nice portraits of each dancer. I decided to shoot these basic portraits first as a way to get to know each of the dancers and get some easy shots in first. Here are a few of those portraits:
Here’s a setup shot showing the basic setup for these – one flash for the main key light, and another tightly-snooted flash to focus light directly on the box.
Here’s a “photo aware” shot showing both Jared (the main subject) and Shane (one of the VADC dancers who did a GREAT job of assisting me with lights & reflectors!).
These were all taken at Frog Island park in Ypsilanti, on the concrete stage that sits on one end of the park. This was a great location – the concrete worked as a great texture, and it was a nice, level surface for the dancers. The mosquitoes were a bit of a pain (summer nights!) and we all sweated a bunch, but it was worth it in the end.
Here’s another setup, showing how we were using the location, and a few of the resulting shots:
The final big shot of the night was a group shot where most of the crew dove to the side while Jared launched Shane up into the air. I never ended up with a shot I completely liked, but it turned out well enough.
Here’s the setup:
And the result:
After we’d packed up and headed back to the parking lot to leave, I remembered that I wanted to get a quick photo of me with the crew, so I set a single flash down on my minivan’s roof, popped the camera on the tripod, and jumped in the frame.
Overall, I had a fantastic time on this shoot – it’s maybe the most fun I’ve ever had taking photos. The main reason I’m going these photoshoots is to improve my skills (along with having fun!). I believe a big part of getting better is reflecting on what worked and what needs to change.
Here are the things I felt I did well:
I brought almost all the gear I’d need (stands, clamps, ladder). A
second mic stand adapter would have been good (so I could use my mic stands for the flashes instead of having to use a tripod for one of them). For this shoot, a pushbroom would have also been helpful (lots of debris on the concrete stage).
I had a vision/plan and executed it well.
I engaged with the crew well – I gave pretty good directions, had a
series of shots in mind & got all of them that I wanted to.
I remembered to get setup shots and a self-portrait with the crew at the end.
I shot good angles and compositions
Here are some things I’d change:
I’d shoot in RAW instead of shooting JPGs – since I have to wait for my flashes to recharge anyway, the slight extra time required for shooting RAW files would be well worth it. There were times during the post-processing that I wish I’d had the flexibility that a RAW file can provide.
I need to pay more attention to the histogram and LCD for fine-tuning exposure,
especially in body details. There were some shots where the highlights were too hot, and some where there was too much shadow.
I’ll always bring extra batteries from here out – I had a flash die part-way through due to dead batteries and was reduced from 3 flashes to only 2.
I’m going to try shooting tethered to my laptop for my next session. It might not have worked well on this shoot (lots of movement around an outdoor set) but I’d like to give it a try.
I need to remember that light temperature/color is controllable via gels on the flashes – I got too caught up in light placement/exposure and forgot about color temperature.
I need to build a pair of DIY variable power controls for my Vivitar 283s in order to get more flexibility out of them. Luckily, there are easy-to-follow plans available (look for these as a future 52 things project!).
This week’s post was a first for me. I’ve been slowly working on improving and expanding my photography knowledge and skills, and this was the first time I’ve asked someone to specifically model for me. My friend and co-worker Cam, an amazing teacher and runner, agreed to be my subject for this shoot.
For this shoot, I took a basic lighting case, containing 3 flashes and my radio trigger system, plus a couple of odds and ends (a roll of gaff tape, a clamp, my DIY softbox, etc).
Along with the lighting case, I also took a couple of my mic stands. I made converters for them to allow me to use them as tripods/light stands (see my DIY photo gear post), and they work great for situations like this since they have a boom arm.
Since Cam is a runner and nature enthusiast, I wanted to put him in a setting that would reflect that. Here’s the setup for one of the looks (a portrait with the woods & sky in the background). I ended up using one Vivitar 285 flash, and one Vivitar 283 flash for these. I experimented with using a softbox on the 283 at times, but left the 285 as a bare flash.
Here are a few of the resulting shots:
We also went into the woods for a different feel. Here’s one setup, designed to capture Cam mid-stride in the woods.
This week’s project didn’t quite turn out the way I had hoped, and it’s a bit late being posted, but here it is: a set of macro photos from a friend’s Yashica 55mm Macro ML lens.
I bought an adapter ring to go from C/Y (Contax/Yashica) to EOS (Canon’s modern lens mount), which allowed me to mount this manual focus lens on my Canon T1i. Here’s a picture of the rear of the lens with the adapter ring.
When I first started investigating the possibility of mounting manual lenses, I started out reading the EOS Cameras and Manual Lenses group’s discussions on Flickr. One recurring issue with using manual-focus lenses was ensuring that the image is in focus, which a modern auto-focus lens does automatically. Using an adapter ring with an auto-focus confirm chip allows the camera to communicate with the lens and provide confirmation that it’s in focus.
Therefore, the first thing I’d bought was an auto-focus confirm chip, purchased from an eBay seller in Hong Kong. I mis-read the chip’s description, thinking it was an adapter ring WITH an auto-focus confirm chip, when instead it was JUST the chip itself.
After that, I bought a simple C/Y to EOS adapter ring, after being assured that it would be a simple thing to mount my mistakenly-bought chip on this ring. Turns out, it’s not so simple. Here’s a comparison of my 50mm Canon lens (left) and the 55mm Yashica lens:
As far as I can tell, the AF confirm chip would need to be mounted at a spot on the Yashica lens where the shutter trip lever sticks out. Initial attempts to place the chip were unsuccessful, so I decided to shelve the idea and try using the lens with manual focus instead.
Here are a couple of photos of a wooden bench. The lens was set to f/2.8 (the largest aperture available), and you can see the shallow depth of field that’s possible, especially on the second shot.
However, it’s quite easy to take shots that are almost in focus, but not quite. These two both looked good through the viewfinder, but upon review are not quite tack-sharp.
I did end up with a few shots I liked a lot, after much trial and error. It turns out the Canon’s auto-metering is about 2 stops off, making me dial in a -2 stop exposure when using Program mode. I shot mostly on Manual after a while, doing critical metering and shutter adjustments on the fly and checking the results on the camera’s LCD screen.
All in all, a good learning experience, even though things didn’t turn out quite as expected.
Day 2 of the workshop was Saturday, and it started off with Andrew Davidhazy talking about high-speed photography. Here’s a shot of him looking a bit mad-scientist as he sets up one of the shots:
Andrew is known for his high-speed photography work. In the shots below, he showed us how he accomplishes some of the shots he’s famous for. The balloon-pop photo was done with an external flash, set to its lowest power (and thus its shortest flash duration) in a completely dark room. The flash gets triggered by a microphone, which sends out a trigger voltage when the balloon loudly pops.
I snagged this shot on the first balloon pop attempt!
In the afternoon, we were treated to a 90-minute tour-de-force of color theory with Glenn Miller.
Finally, Saturday’s sessions concluded with Andrew Davidhazy talking about and demonstrating strip camera photography. He modified a Canon AE-1 film camera with the imaging electronics from a small scanner, and created a camera that takes strip photos, also called roll-out photos. Here’s the apparatus:
Here’s a photo Andrew took of me with his DIY strip camera. To make this work, I had to stand on a heavy-duty turntable and slowly rotate, as the camera scanned one line at a time.
Day 3 was Sunday, and it started with a wrap-up session. Here’s Herschel Mair, an incredibly knowledgeable and talented photographer who is currently based in Oman:
After our wrapup session and lunch, we headed into downtown Rochester to visit the George Eastman House, home of George Eastman, who founded Eastman Kodak. Here’s a view along East Avenue, the street that the museum is on:
George Eastman House plaque:
One of the first exhibits in the museum was an overview of historically significant photos and photography equipment. One that struck me was the photo of the flag-raising on Iwo Jima during World War II. I’ve been reading a lot of WWII history over the last few years, so this was especially meaningful.
One of the exhibits I enjoyed the most was “Persistent Shadow”, a showing of photographic negatives through the history of photography. This quote by Ansel Adams sums it up: ” The negative is the equivalent of the composer’s score and the print is the performance”.
It was an interesting experience being immersed in so much film-based photography this weekend, and this exhibit certainly fed into that. I’ve shot strictly digital for so long that the idea of shooting film is almost foreign to me (though I do have a few film-based projects in the concept stage for upcoming 52 things projects).
After the museum, it was time to hit the road again.
I stopped in Cleveland long enough to snap a few shots of a lovely sunset over Lake Ontario (and gloat about the recent Boston Celtics win over the Cleveland Cavaliers).
As the sun slowly sunk below the clouds and hills, a beautiful orange light shone across the highway, and I couldn’t resist snapping a few shots as I sped toward home…


")
")


